
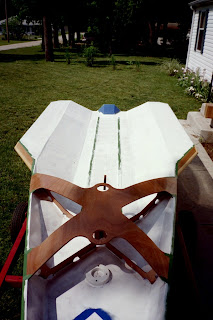
Masking of the the boat has begun. The lay out of my lines on the bow were easy taped 2 8x11 paper together to make a square put a point on center then ran that up the bow till the two outside tips hit the side of the boat. Worked out really easy and quick.
 Here is the first attempt at using Interlux prime coat. It is a more complex 3-1 mix with reducer never worked with paint like this. It is an epoxy I had a hard battle all the way through this kicked off way to fast and left me with really bad and ugly finish. The good news is that this is all covered with thick paint that has sand in it for traction. The prime coat was all bad news, to hot, to fast of kick off it literally was pulling the foam off of the roller!! The pick below is the Interlux top coat and went on really nice much more like paint!
 SAILS ARE IN!!!! Thanks to Dave at Baxter sails great service excellent workmanship!!!www.baxtersailmakers.com
 Start and finish to the bow detail. This was much easier than I thought it would be just some patience, a little skill with a chistle, little knife work and ended up with a real nice fit. Used my scroll saw to cut the angles in and now really wish i could go back and do the wing tips on the same saw it really works well for this multi angle stuff. All you need is a good lay out and eye.

 Epoxy and glass work being done on center board also how I did the dagger board. There is a trick to getting glass to lay down on such a thin object. Got to lay the epoxy on thick enough to saturate the glass and catch the runs as needed. Hanging it this way lets you get both sides at once.
 Varnish work on the boom getting done this is also how I put the epoxy on.
  Trial fit of mast in both positions just to make sure.
 Here is the prime coat going down on the bottom side went a lot better two corrections done to help it work better for me first is doing it during the morning during the cool of the day and secondly is that this product works best with thick coats not thin coats. The lay of the lines was simple here my 2'' glass tape over the center joints had the most sin in them. Hind sight tells me I could of covered a lot with a quick layer of #4 glass over the center joint area. At any rate I recovered nicely with this simple lay out used a 12'' roller and laid it out using the holes from the stitching process to establish a consistent mask area. No real math involved just done by eye on the first side until I got what i wanted then transferred all to the second.
 First coat of Rochelle red Interlux perfection. Went down a lot easier than their primer. Going to be a seriously beautiful boat. Lots of sanding to get to this point about 3-4 times more than the build time.
  Final coat looking good.
 The varnish work on the mast screw in the bottom the pvc cart is a start on a cart for the boat used that to support at the connection end. Not easy to varnish round things the final product turned out good.
 Here is the dagger board and center board getting varnished. It was easier to leave out the handles until all finishing was done and then touch up the handles.
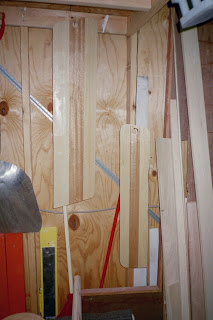 Here is my set up for trimming in the mast and top mast for the connection which I made from aluminum tubing. I found a excellent source at http://www.globatecheng.com/ I went with the 2.5 tube 11 gauge .120 wall then turned off .4o off the out side diameter and left the tube just a little thick at .090. Hope to get better pics of the mast soon.

 The lay out of my lines on the bow were easy taped 2 8x11 paper together to make a square put a point on center then ran that up the bow till the two outside tips hit the side of the boat. Worked out really easy and quick.
 Here is the first attempt at using Interlux prime coat. It is a more complex 3-1 mix with reducer never worked with paint like this. It is an epoxy I had a hard battle all the way through this kicked off way to fast and left me with really bad and ugly finish. The good news is that this is all covered with thick paint that has sand in it for traction. The prime coat was all bad news, to hot, to fast of kick off it literally was pulling the foam off of the roller!! The pick below is the Interlux top coat and went on really nice much more like paint!
 SAILS ARE IN!!!! Thanks to Dave at Baxter sails great service excellent workmanship!!!www.baxtersailmakers.com
 Start and finish to the bow detail. This was much easier than I thought it would be just some patience, a little skill with a chistle, little knife work and ended up with a real nice fit. Used my scroll saw to cut the angles in and now really wish i could go back and do the wing tips on the same saw it really works well for this multi angle stuff. All you need is a good lay out and eye.

 Epoxy and glass work being done on center board also how I did the dagger board. There is a trick to getting glass to lay down on such a thin object. Got to lay the epoxy on thick enough to saturate the glass and catch the runs as needed. Hanging it this way lets you get both sides at once.
 Varnish work on the boom getting done this is also how I put the epoxy on.
  Trial fit of mast in both positions just to make sure.
 Here is the prime coat going down on the bottom side went a lot better two corrections done to help it work better for me first is doing it during the morning during the cool of the day and secondly is that this product works best with thick coats not thin coats. The lay of the lines was simple here my 2'' glass tape over the center joints had the most sin in them. Hind sight tells me I could of covered a lot with a quick layer of #4 glass over the center joint area. At any rate I recovered nicely with this simple lay out used a 12'' roller and laid it out using the holes from the stitching process to establish a consistent mask area. No real math involved just done by eye on the first side until I got what i wanted then transferred all to the second.
 First coat of Rochelle red Interlux perfection. Went down a lot easier than their primer. Going to be a seriously beautiful boat. Lots of sanding to get to this point about 3-4 times more than the build time.
  Final coat looking good.
 The varnish work on the mast screw in the bottom the pvc cart is a start on a cart for the boat used that to support at the connection end. Not easy to varnish round things the final product turned out good.
 Here is the dagger board and center board getting varnished. It was easier to leave out the handles until all finishing was done and then touch up the handles.
 Here is my set up for trimming in the mast and top mast for the connection which I made from aluminum tubing. I found a excellent source at http://www.globatecheng.com/ I went with the 2.5 tube 11 gauge .120 wall then turned off .4o off the out side diameter and left the tube just a little thick at .090. Hope to get better pics of the mast soon.


